Bifrost - Splash simulation (I)
BIFROST - WATER SPLASH SIMULATION (I)
Bifrost is a tool for Maya that allows for fluids simulation. Therefore it is related to physics.
It was acquired by Autodesk in 2012.
My purpose is exploring it in order to make a convincing splash of water on the animation project, particularly on the scene when the fairy falls into the wates of the canal.
I have watched and read through some Bifrost material with mixed results. I have finally followed this simple video that finally allowed me as a valid starting point. The experiment simulates the splash of water produced by a rigid, heavy, sphere over a small water container.
Youtube link to TunnelvizionTV's video that I have followed:
https://www.youtube.com/watch?v=BvZKiI1BEGk


SUMMARY
1: Create a container Cube.
2: Create a liquid emitter. It will only be used to fill the container.
3: Create Bifrost Liquid (with the liquid emitter box selected).
4: Set the Cube as Collider, so that it is able to contain the liquid.
5: Create a Kill Plane to save computational resources by ignoring pouring water.
6: Set Initial state: let the animation run so that it fills the container. Pick a frame where is already filled (estable) and select it as starting point. Take the emitter box out of the way.
7: Create a sphere. Add physics to it (Bullet plug-in/ Rigid body properties).
8: Let it run
STEPS
Start by
creating a cube "container"
4 x 2 x 4
Extrude face (twice)

Create a
"emitter" cube, for the water, liquid
In Wireframe mode
It fits inside the box
3.2x1.8x3.2

Create
the Bifrost Liquid
With the Emitter selected, change to the FX module, and select
Bifrost/ Create/ Liquid
Liquid items will be created.
Change the point size ofr the Liquid to 3.00 to be able to see
better the particles

Make sure
that the Playback Speed is set to <Play Every Frame, Max Real-time>
So that it doesn't miss any frame on the calculations.
Set the
Cube as Collider
Select the Liquid + (CTRL) Select the Contariner
Select Bifrost/ Collider
Increase
the simulation Resolution: reduce the Max Voxel Size: from 0.5 to 0.2
Move the
emitter up from the container box.
Create a
"Kill Plane" for saving computational power. Any particle that leaves
the kill plane will be removed from the calculations, saving some computational
power.
Select the <Bifrost Liquid element>
Go to Bifrost/ KillPlane
Resize

Let it
simulate for a while:

Set
Initial State: avoid transient states (filling of the recipient)
I pick an "stable" point, such as frame 95, where the big
mass of water has already fallen and the recipient is full.
Then go to Bifrost/ Set Initial State
Now if I come to frame 1, it is as if it was computing from frame
95, leaving the "transition" of filling the cube out.
Take the
Emitter out of the way
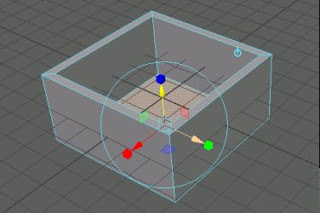
Create
a sphere (radius = 0.6) and place it above the liquid.

Enable
the "Bullet" plug-in module.
Select
Rigid-body porperty.

It may give an error: "The current drawing API isn't supported". Just ignore it.
If we test (Playback) now we'll see that the sphere trespasses the
box and liquid, ignoring them.
Make the
sphere a Collider as well.
Select first the Bifrost Liquid and then the Sphere. Then apply
Collider from the Bifrost Menu
Sphere:
change properties of the bulletRigidBodyShape
- Collider Shape Type: Sphere (not box)
- Mass: 50.00 (not 1.0)
Now there
is a splash effect on the water when the ball goes through.

RENDERING
I've done some tests on the rendering result:


Comentarios
Publicar un comentario