The Solution: Alembic Cache
ALEMBIC CACHE
INTRO
Today I'll show the complete workflow for simulating the splash of water in Maya using Bifrost and then importing it into Unreal Engine.On the last episode our hero was left in a sea of doubts, wondering if he'd have to abandon the idea of simulating the water in Bifrost and start a singing career instead. Well, either that or finding a new approach for the water simulation.
Actually I researched a few options to do the water splash simulation in Maya and found a few some interesting options. The most promising and similar in approach to Bifrost (use of particles) looked like NVIDIA Flex. I however didn't follow that path. I leave some links on the bottom if you want to explore it.
Doing a short recap, I was stuck on how to export the simulation done in Bifrost to Unreal. The solution came from an option in the Bifrost Fluid simulation to convert the simulation into a mesh and using an export called Allembic Mesh. Thanks Michael Connolly for guiding me in that direction.
Workflow Summary
1: Do Bifrost Simulation
1.1: Create the container (geometry)
1.2: Add the emitter
1.3: Let the emitter flow till it fills the container.
1.4: Do a cut on a frame where is done (set initial condition) and remove the emitter.
2: Add a falling Rigid Body
2.1: Add the rigid body that will fall into the water (fairy). Make it collider with the fluid as well.
2.2: Let it play to see the effect of the impact in the water.
3: Convert the fluid to Mesh
4: Export result to Alembic Cache format (abc)
5: Import the result into Unreal
STEP1: CREATE THE BIFROST FLUID
Create container
Create Emitter

Create Liquid
<Module FX>: Bifrost Fluids / Create..Liquid

Set the Cube (container) as collider

Max. Voxel Size: from 0.5 to 0.2
Move Emitter up of the box:
Add kill plane
With the Bifrost Liquid selected

Press Play and let it simulate for a while
Make sure that Play Every Frame, Max Real-Time is selected.

Set Initial State.
On frame 110, go to Bifrost Fluids/ Set Initial State
Now Frame 1 is like Frame 110, like starting from there. Removed transient state.
Get the emitter out of the way, it is no longer useful.

STEP2: ADDA FALLING RIGID BODY
Import the Fairy Model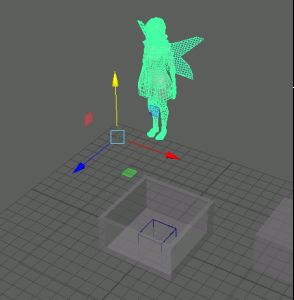
Select Rigid-body property (Enable the "Bullet" plug-in module if not present yet).
It may give an error, just ignore it
If we play the animation on this stage, the result is that the fairy will fall because of the effect of gravity, but it will trespass the water, without interacting with it.
Make the sphere a Collider as well.
Select first the Bifrost Liquid and then the Fairy. Then apply Collider from the Bifrost Menu
Now there is liquid movement:

STEP3: CONVERT INTO MESH
The previous simulation has been done using Particles in Bifrost.
Bifrost however allows converting to the particles effect into a mesh, and that is the option that we are going to use, in order to be able to import it into Unreal Engine.
Select the Fluid, and on the LiquidShaper properties, on the Bifrost Meshing tab, enable the mesh.

Also, disable the Particles Display

A new mesh element will have appeared.

Let the simulation work away again. Now you'll see a mesh instead of the particles.


STEP4: EXPORT ALEMBIC CACHE
Export AlembicAlembic is a file format (.ABC): application independent set of baked geometric results.
Select the Liquid Mesh
On the FX tab, go to Cache / Export Select to Alembic

Select the range of the simulation.

Export: it will simulate for a while and produce the alembic file.


STEP5: IMPORT ALEMBIC INTO UNREAL ENGINE
Import into UE: drag the abc file from the explorer to the content folder in UE.On the import window make sure to change from Static Mesh import to Geometry Cache.

After a while it should import with no problem. Drag it to the scene to see how it looks like.
The mesh needs resizing And also needs rotating.

If you play the scene, it will animate.
I applied a Water_Lake material from the Starter Content pack to see the effect:

Mixed with a plane:


The experiment worked well in the end. It was not the perfect simulation, and left me with some questions and challenges (such us how to animate it in Unreal, why some of the weird shapes, etc.). But it was a good text and workflow.
APPENDIX: MORE ON BIFROST MESH AND ALEMBIC
https://knowledge.autodesk.com/support/maya/learn-explore/caas/CloudHelp/cloudhelp/2018/ENU/Maya-Bifrost/files/GUID-B5D406CF-922E-46BD-9238-9BB48347055D-htm.html
https://knowledge.autodesk.com/support/maya/learn-explore/caas/CloudHelp/cloudhelp/2018/ENU/Maya-Bifrost/files/GUID-39E8E699-81DA-4638-BDAD-7DA5E8FAE7A6-htm.html
https://www.youtube.com/watch?v=Y9rbc5vIW34
https://docs.unrealengine.com/en-US/Engine/Content/AlembicImporter/index.html
https://www.youtube.com/watch?v=hBR3I7bAaEg
https://knowledge.autodesk.com/support/maya/learn-explore/caas/CloudHelp/cloudhelp/2018/ENU/Maya-Bifrost/files/GUID-B5D406CF-922E-46BD-9238-9BB48347055D-htm.html
https://www.youtube.com/watch?v=fBO_IiZXN8A
https://www.youtube.com/watch?v=sPZM9vCXt7k
APPENDIX: NVIDIA FLEX
Nvidia Flex is a particle system simulation that can be used into UE4. They are particles (spheres) that look like fluids.https://forums.unrealengine.com/development-discussion/engine-source-github/42701-how-to-integrate-nvidia-flex-into-unreal-engine-4
https://developer.nvidia.com/flex
https://www.youtube.com/watch?v=YAT31ZDzZm8

Comentarios
Publicar un comentario