Octoplug Ocean Shader (II): testing ocean deformer shader
Octoplug Ocean Shader (II) - First test, ocean deformer shader

I have followed the example provided by Silvestre Julien. See below the link in Vimeo.
I has taken me days to finish even though it is a very short video. I think it is simply aimed to more expert users of Maya. It was challenge for me to follow it, as I had so far escaped from the Node editor, and pretty much everything is setup here using the power of the nodes. But I ended up happy with the result, plus I learnt a little bit about the Node editor on the process. I have to recognize that I don't fully understand nearly any of the steps but I hope I'm able to replicate them when needed!
I'm hoping to be able to use this solution into the Fairy animation project, to simulate the waters of the canal.
Summary
The steps followed were:
- 1. Create a plane and adjust its size and grid. This will be used as reference.
- 2. Create a mesh on the Node Editor. This will be the mesh for the Ocean Surface.
- 3. Create a Octoplug's Ocean shader on the Node editor. Connect the two shape nodes of the two meshes through the Ocean shader in between them. This will have created a dependency between the two surfaces, and we can see already the Ocean Surface with waves (more like spikes really) on it.
- 4. Next you have to connect the <time> element to the OceanShader so that the geometry varies with the timeslider. At this point it will start to have some animation.
- 5. Tweak the parameters to move from something brisk and spiky into something more similar to a sea wave.
- 6. Test by playing.
Detailed Steps
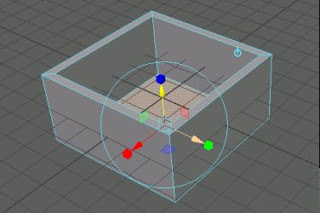
Create a Polygon plane.
Resize the polyPlane: 25x25 size and 100x100 subdivisions.

Create a mesh:
On the node editor, press TAB and search for Mesh
Apply. It will have created a new shape, a plane (polySurface).
On the node editor, press TAB and search for Mesh
Apply. It will have created a new shape, a plane (polySurface).

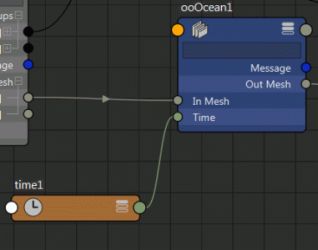
Create an Octoplug Ocean Shader in between the meshes
Expand both meshes
Connect the meshes through the OceanShader:
From the WaterPlane's mesh to the Ocean Shader
World Mesh[0] to the "In Mesh"
From the OceanShader to the new mesh
Out-Mesh to In-Mesh
Expand both meshes
Connect the meshes through the OceanShader:
From the WaterPlane's mesh to the Ocean Shader
World Mesh[0] to the "In Mesh"
From the OceanShader to the new mesh
Out-Mesh to In-Mesh

This will have modified the shape of surface shape, so now is similar size and kind of waves on it.
Renamed to <OceanSurface>

Now we add the <time> node
On the outliner, un-tick <DAG Objects Only>

Thank you Raziel:
http://discourse.techart.online/t/how-to-connect-time-node-to-an-custom-attribute-in-maya/4228/2
Drag it from the Outliner.
Connect the time1 (<Time-Out>) to the Ocean Shader (<Time>).
Assign a Lambert material to the Ocean Surface
Select the ocean shader and right click to Assign existing material
Drag it from the Outliner.
Connect the time1 (<Time-Out>) to the Ocean Shader (<Time>).
Assign a Lambert material to the Ocean Surface
Select the ocean shader and right click to Assign existing material
Let's play with the Ocean Shader parameters
Change the Spectrum/ scale
<scale> = 1.00 to <scale> = 25.00
Change the Spectrum/ scale
<scale> = 1.00 to <scale> = 25.00

Wave/ Reflection and Scale
Reflection: 0.00 to 0.5
Align: 1.00 to 10.00
Let's play it, and it moves (waves)!
Reflection: 0.00 to 0.5
Align: 1.00 to 10.00
Let's play it, and it moves (waves)!


Comentarios
Publicar un comentario